Category: Network and IT System

  • How to build RustDesk on Portainer with Cloudflare domain (Disable proxy needed)?

    This version is not PRO. Please note that. Soon, PRO will be coming. I just set up RustDesk pro with WebGui a couple of months ago.

    Please listen carefully to the RustDesk warning again. Do not install RustDesk and connect to the phone agents (fake windows, fake apple, fake ATT, fake bank, fake IRS) server. They will trick you and take your personal information.

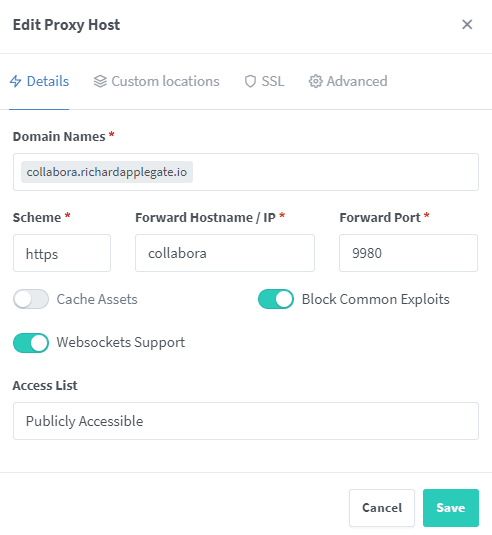
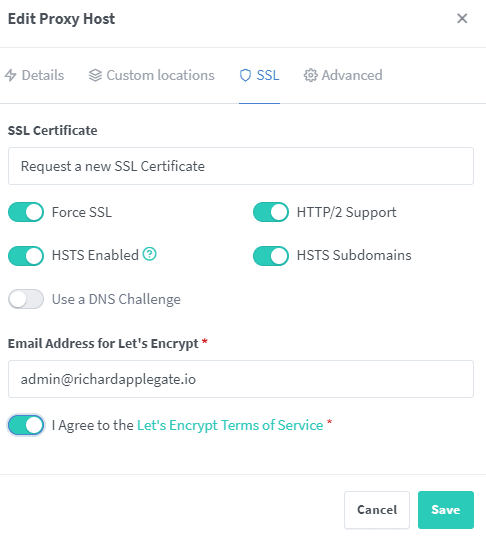
    This solution is significantly less costly than TeamViewer and provides the most efficient solution for my job. It is also significantly less costly than TeamViewer. It allows me to resolve any issues on my employees or family’s computers, which reduces the cost of resolving the issue. Not only that, but it is highly secured. I chose to employ enforced encryption on RustDesk because I’d prefer not to expose it to the public and exploit my RustDesk server.

    Written Instruction:

    version: '3'
    services:
      rustdesk-server:
        container_name: rustdesk-server
        ports:
          - 21115:21115
          - 21116:21116
          - 21116:21116/udp
          - 21117:21117
          - 21118:21118
          - 21119:21119
        image: rustdesk/rustdesk-server-s6:latest
        environment:
          - "RELAY=rustdesk.example.com:21117"
          - "ENCRYPTED_ONLY=1"
          - "DB_URL=/db/db_v2.sqlite3"
          - "KEY_PRIV=YourPrivateKEY"
          - "KEY_PUB=YourPublicKey"
        volumes:
          - /home/applegate/docker/rustdesk/db:/db
        restart: unless-stopped

    This command line on the ssh terminal generates the key you require.

    Command: docker run –rm –entrypoint /usr/bin/rustdesk-utils rustdesk/rustdesk-server-s6:latest genkeypair

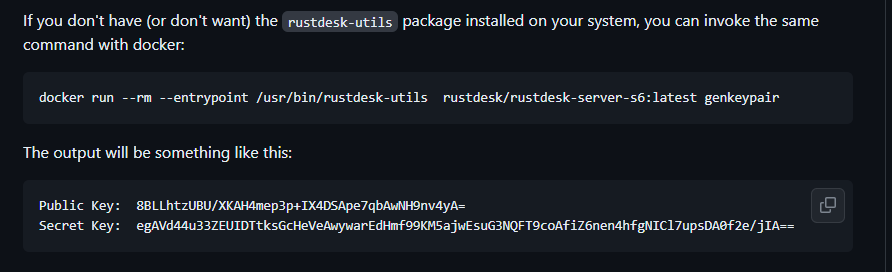
    Copy and paste the key into your docker-compose environment.

    Then, you should deploy the stack. You’ve got your RustDesk up and running, and it’s encrypted, so no one can mess with it.

    Video Instructions:

  • How to build LanguageTool API Portainer with nginx

    I have been using Grammarly for my work and to strengthen my writing skills. I was looking for something cheaper and more affordable, and I found this LanguageTool, which offers an API on Docker, and it works great. We won’t get premium, though… they’re not yet available for self-hosted premium.

    Before we start, please make sure your NGINX Proxy Manager and Portainer are up and running. It is unnecessary to establish a network as it has already been integrated into Docker.

    Go to Portainer sites→ Login admin→ stacks → add stacks:

    version: "3"
    services:
      languagetool:
        image: erikvl87/languagetool
        container_name: applegate-languagetool
        networks:
            - nginx
        environment:
            - langtool_languageModel=/ngrams  # OPTIONAL: Using ngrams data
            - Java_Xms=512m  # OPTIONAL: Setting a minimal Java heap size of 512 mib
            - Java_Xmx=1g  # OPTIONAL: Setting a maximum Java heap size of 1 Gib
        volumes:
            - /mnt/applegate5tb/language-tool/data:/ngrams
    networks:
      nginx:
        external: true

    Now deploy the stack and open the nginx proxy manager sites to add this secure HTTPS site. Let’s get started.

    Scheme – HTTP
    Forward Hostname – your container_name
    Forward Port – 8010 (Default on docker for LanguageTool).
    Ensure enable SSL and HTTP/2 and HSTS

    Your websites have been successfully launched. Go check it out and try the API out.

    To connect to this API, please download language tools for Edge or Firefox or Chrome. Please note that Desktop PCs do not yet have API support. Stay tuned on this.

  • How to set up the Collabora office with portainer and Nginx.

    My goal to make my Nextcloud to become Google Workspace because my goal is our data most important to privacy with our data sensitive. And I would like to purchase free instead of paid Google Workspace because we have our server, and we use it for IT documents and resources.

    So, you need to make sure nginx proxy manger and Portainer Up running before we start this.

    We do not need to create a network because we already did created with nginx proxy manager (nginx)

    Portainer sites → login admin account → stacks → add stacks

    version: '2'
    services:
       applegateoffice:
         container_name: collabora
         image: collabora/code:latest
         restart: always
         expose:
           - 9980
         cap_add:
           - MKNOD
         networks:
           - nginx
         environment:
           - username=yourusername
           - password=yourpassword
           - aliasgroup1=https://yoursubdomain.yourdomain.io
           - aliasgroup2=https://yoursubdomain.yourdomain.io
           - extra_params=--o:net.proto=IPv4
    
    
    networks:
      nginx:
        external: true

    Start the deployment and go to nginx proxy manager to add proxy host detail.

    Advanced Custom Nginx Configuration

    # static files
    location ^~ /loleaflet {
      proxy_pass $forward_scheme://$server:$port;
      proxy_set_header Host $http_host;
    }
    
    # WOPI discovery URL
    location ^~ /hosting/discovery {
      proxy_pass $forward_scheme://$server:$port;
      proxy_set_header Host $http_host;
    }
    
    # main websocket
    location ~ ^/lool/(.*)/ws$ {
      proxy_set_header Upgrade $http_upgrade;
      proxy_set_header Connection "upgrade";
      proxy_http_version 1.1;
      proxy_pass $forward_scheme://$server:$port;
      proxy_set_header Host $http_host;
      proxy_read_timeout 36000s;
    }
    
    # download, presentation and image upload
    location ~ ^/lool {
      proxy_pass $forward_scheme://$server:$port;
      proxy_set_header Host $http_host;
    }
    
    # Admin Console websocket
    location ^~ /lool/adminws {
      proxy_set_header Upgrade $http_upgrade;
      proxy_set_header Connection "upgrade";
      proxy_http_version 1.1;
      proxy_pass $forward_scheme://$server:$port;
      proxy_set_header Host $http_host;
      proxy_read_timeout 36000s;
    }

    Once the configuration has been saved, proceed to open the newly created domain.

    Now we go over the Nextcloud

    Save and your sites are now in collaboration with the office.

Secret Link