Tag: Final

  • Network Cabinet Upgrade: Benefits & Setup Guide

    The excessive wiring and the way everything was stacked weren’t viable long-term solutions. I approached my supervisor to request an upgrade to a more secure and durable setup. Installing a network cabinet would help cut down on dust buildup and prevent overheating. Plus, adding an exhaust fan to the cabinet would efficiently vent hot air, making it easier to keep the system cool. We still have three more locations to take care of before the network cabinet installations are fully finished.

    Before
    I intend to rewire and cable everything next month to ensure proper cable management.
    After.


    More Picture of another stores:

    https://richardapplegate.io/network-experience/
  • Linux Beginners Guide: Essential Commands to Know

    This command line can be used to look up the operating system.

    The command is here.

    hostnamectl
  • Auto-Update Docker Containers with Watchtower & Ntfy


    Maintaining Docker containers is easy—in theory. In practice, keeping your stack up-to-date with the latest images can be tedious and time-consuming. Here’s a solution: Watchtower can update containers automatically, and with Ntfy, you get real-time notifications right on your phone or desktop whenever an update occurs!

    Best of all: you can set it all up through Portainer’s GUI. In this tutorial, I’ll walk you through a complete setup: no command line required.


    Why automate Docker updates?

    Manual container updates aren’t just inconvenient, they can lead to missed security patches and downtime. Watchtower eliminates this pain, pulling new images and restarting containers automatically, all on a schedule you control.

    But automation can be a little scary—how do you know what’s happening? That’s where Ntfy comes in. With just a few lines of configuration, Watchtower can send push notifications to your phone or browser. You’re always in the loop, wherever you are.


    What you need

    • Docker running on your server.
    • Portainer set up for easy container management.
    • (Optional) Ntfy self-hosted or use ntfy.sh free public service.

    Step 1: Pick (or create) your ntfy topic

    Think of a topic as a notification channel. For this setup, I’ll use watchtower-notify as my topic. You can pick whatever you like. If you want privacy, choose a hard-to-guess topic or set up authentication (see ntfy docs).


    Step 2: Build your Watchtower stack

    In Portainer:

    1. Go to “Stacks” and click “Add Stack”.
    2. Give your stack a name, e.g., watchtower.
    3. Enter the following Docker Compose configuration, replacing the topic with yours:
      yaml version: "3" services: watchtower: image: containrrr/watchtower container_name: watchtower restart: unless-stopped environment: - WATCHTOWER_WATCHDOG=true - WATCHTOWER_CLEANUP=true - WATCHTOWER_NOTIFICATIONS=ntfy - WATCHTOWER_NOTIFICATION_NTFY_TOPIC=watchtower-notify - WATCHTOWER_NOTIFICATION_NTFY_URL=https://ntfy.sh volumes: - /var/run/docker.sock:/var/run/docker.sock
    • If using a private ntfy topic with token:
      Add
      - WATCHTOWER_NOTIFICATION_NTFY_TOKEN=your-ntfy-token
      under environment.
    1. Click Deploy the stack.

    Step 3: Subscribe to your notifications

    You’re almost done! To receive updates:

    • On your phone: Install the Ntfy app (iOS or Android), and subscribe to your topic, e.g. watchtower-notify.
    • In your browser: Visit ntfy.sh/your-topic-name.

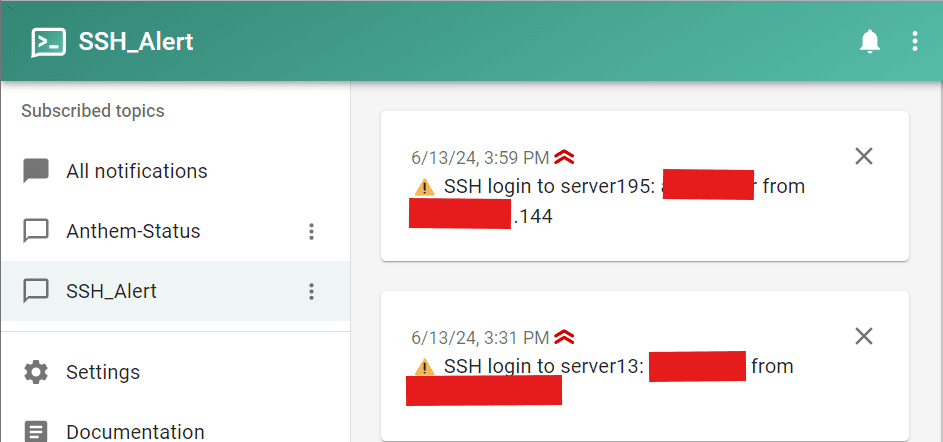
    When Watchtower pulls an updated image and restarts your containers, you’ll get a message right away!


    What does a notification look like?

    Example:

    watchtower
    The container xyz was updated and restarted.

    You can fine-tune both your notification topic and Watchtower’s update schedule in your docker-compose.yml file.


    Extras and Security


    Conclusion

    With Watchtower, Docker containers stay up-to-date, and with Ntfy, you’re always up-to-speed on every change. Combine both with Portainer’s user-friendly interface, and managing containers becomes almost effortless.

    Did you try it? Have tips or questions? Let me know in the comments!


    Resources:


    Happy automating! 🚀

  • Ntfy Push Notifications: SSH Alerts & Docker Updates

    I am using Ntfy for my SSH alert and watchtower update. It is pretty cool to have this feature, so I can know who is accessing my server without my authorization. And know my docker needs to be updated as well.

    SSH Alert Example

    Command this to open code,

    nano /etc/pam.d/sshd

    Please add this code to the bottom of the page.

    session optional pam_exec.so /usr/local/bin/ntfy-ssh-login.sh

    You should create a script file called /usr/local/bin/ntfy-ssh-login.sh

    nano /usr/local/bin/ntfy-ssh-login.sh

    Here code, make sure you change the server URL and username and password for nginx auth.

    #!/bin/bash
    # This is a PAM script hook that shows how to notify you when
    # somebody logs into your server. Place at /usr/local/bin/ntfy-ssh-login.sh (with chmod +x!).
    
    TOPIC_URL=yourntfydomain
    NGINXUSER=yourusername
    NGINXPASSWORD=yourpassword
    
    if [ "${PAM_TYPE}" = "open_session" ]; then
      curl -u ${NGINXUSER}:${NGINXPASSWORD} -H tags:warning -H prio:high -d "SSH login to $(hostname): ${PAM_USER} from ${PAM_RHOST}" "${TOPIC_URL}"
    fi

    Then Now you save Ctrl +x then yes

    Make sure you have chmod permissions. Here is the command.

    chmod +x /usr/local/bin/ntfy-ssh-login.sh

    Go try logging into another terminal and see if it notifications you, then try logging in again and see if it notifications you. 🙂

    It works well. It shows the username and IP address, so the IT team can protect the account if they don’t have permission to access our server.

  • Self-Hosted Bitwarden Setup & Login Guide

    Step by step:

    1. Download the Android apps “Bitwarden Password Manager” and for apple “Bitwarden Password Manager
    2. Open Bitwarden password app
    3. Login in on → self-hosted
    4. Server URL is Https://bitwarden.richardapplegate.io
    5. Login to your account. If you don’t have one, ask Richard Applegate to open a registration. I have to close the register to be more secure and stay away from bots.
  • Build Dockerfile on Windows 10: Step-by-Step

    Building a Dockerfile on Windows 11 is a common workflow for containerized development. Here’s how you can do it—step by step:


    1. Install Docker Desktop for Windows

    • Go to the Docker Desktop download page.
    • Download the Windows installer and run it.
    • Follow the prompts (ensure “WSL2” support is selected, if available).
    • NOTE: Windows 11 works best with WSL2.

    2. Write Your Dockerfile

    • Use a code editor (e.g., VS Code, Notepad++).
    • Save your Dockerfile as simply named: Dockerfile (no extension).
    • Example (Python app):
    FROM python:3.11-slim
    WORKDIR /app
    COPY . .
    RUN pip install -r requirements.txt
    CMD ["python", "app.py"]

    3. Open a Terminal

    • On Windows, you can use:
    • Windows Terminal (wt command)
    • Command Prompt (cmd)
    • PowerShell
    • WSL2 Terminal (Recommended)

    4. Navigate to the Dockerfile Location

    Use the cd command to go to your project directory:

    cd path\to\your\project

    5. Build the Docker Image

    Use the docker build command. For example:

    docker build -t my-app:latest .
    • -t my-app:latest gives your image a name and tag (latest).
    • The final . means “use the Dockerfile in the current directory”.

    6. Run the Docker Container (Optional)

    Test your image:

    docker run --rm -it my-app:latest

    7. Troubleshooting

    • If Docker commands aren’t recognized, make sure Docker Desktop is running.
    • Check Windows Terminal settings if using WSL2, and ensure file sharing is set up for your code folders.

    Summary Table

    StepCommand/Action
    Install DockerDownload & install Docker Desktop
    Write DockerfileUse text editor, save as Dockerfile
    Open TerminalPowerShell, CMD, WSL or Windows Terminal
    Go to directorycd path\to\project
    Build imagedocker build -t my-app:latest .
    Run containerdocker run --rm -it my-app:latest

    Tip: You can use Docker Desktop’s GUI to see your images and containers as well!

  • Upgrade Your Boss’s PC: Graphics Card, RAM & WiFi 6

    I upgraded his PC, Graphic Card, Power Supply, RAM, WiFi6 Network Card to improve speed and stabilized his golf game.

  • RustDesk Privacy Mode: Secure Remote Access Without Exposure

    This is most important for me to work on troubleshooting with PC Sticks. So I don’t want an expose password that i type. This is great.

    I’ve also set up three more rust desk relay servers on my machine so we can connect without any issues between Washington State and Arionza.

    We commenced utilizing rustdesk in August 2023, and their updates have been impeccable. We desire the service we receive, and I am grateful for their dedication to their work. I recommend that you consider purchasing a professional license if you wish to construct your own server.

    https://rustdesk.com/pricing.html

    Check it out and good price!

  • Wireless Internet Bridge Setup | Garyland WA

    Goal to set up

    Blue Dot: Starlink connected to ubiquiti dream station, that we want

    Green Dot: Xfinity connected to ubiquiti dream station.

    We want to discontinue Comcast’s service at Green Dot so that Blue Dot can provide internet to Green Dot instead. He is considering setting up a wireless bridge between the two rooftops, but he needs my assistance to establish a connection from Blue Dot’s Ubiquiti (connected via Starlink) to Green Dot’s Ubiquiti. This would allow him to cancel the Xfinity plans.

    I successfully installed new wiring, which required me to access the attic for the first time. The project involved drilling to run two Cat6 cables for a client’s access point and a NanoBeam 5AC Gen 2 in a cottage house. Altogether, I installed ten Cat6 cables to support both the cottage and the hotel laundry building.

    I have successfully reached the owner and assured him that it is safe to cancel his Comcast Business service. He can now transition to Starlink and take advantage of their new advanced protocols.

    Laundry Hotel, i did install it there and set It up as Main Internet, then cottage i did set AP bridge, and now it is working
    Added 2 new wires for NBE-5AC-Gen2 and UAP-AC-LTE
    That is where I plan to put Mount AP on there.
    NanoBeam 5AC Gen 2
    Cottage house (client router)
    Zip tie all blue cable and power. Yellow cat 5e already removed. So it all nice and clean.

    100 download and 100 upload good speed between Hotel to cottages.
    . 2 miles away not bad
    Hotel wifi access point to cottage house
  • Anthony’s Restaurant Point Defiance: Family Dining Review

    I decided to treat Jasmine with a nice dinner, and it was really good once we had time.

    I’m having a bacon charburger and jasmine with Australian Lobster Tail. They were amazing, the art was beautiful and the chef did an excellent job.

    My dad used to work there for 9 years as a chef and it’s really awesome. The view is beautiful 😍

Secret Link